Wednesday, 22 November 2017
Monday, 22 May 2017
Summer Shop Update
Hi everyone!
I've just updated my store on Etsy four fabulous new shawls, including two very special shawls in my own handspun merino yarn.
Neon Rainbow in handspun merino
Rainbow splash in handspun merino
Peony in shades of pink and purple
Cherry red in shades of red, purple with hints of green and peach
During the month of June I shall be taking part in the Cloth Nappy Addicts "Buy British Month". Check the Facebook group for more details of offers and discount coupons.
I've just updated my store on Etsy four fabulous new shawls, including two very special shawls in my own handspun merino yarn.
Neon Rainbow in handspun merino
Rainbow splash in handspun merino
Peony in shades of pink and purple
Cherry red in shades of red, purple with hints of green and peach
During the month of June I shall be taking part in the Cloth Nappy Addicts "Buy British Month". Check the Facebook group for more details of offers and discount coupons.
Monday, 6 March 2017
Spring Shop Update!
Spring is in the air and I've just added three new shawls to my Etsy store Mrs Flowerpot's.
This cream shawl is a new design. I've crocheted it in an alpaca and silk blend yarn and words cannot describe just how soft it is. It's like wearing a cloud!
Next up I have this fresh pistachio green shawl, crocheted in a super soft pure merino yarn. Can be warm as a scarf on a chilly spring morning or as a wrap on a cool summer evening.
And finally something a little bit different. Dragon wing is an asymmetric scarf with a textured pattern in variegated shades of green, grey and blue.
Visit my Etsy shop Mrs Flowerpot's for further details.
This cream shawl is a new design. I've crocheted it in an alpaca and silk blend yarn and words cannot describe just how soft it is. It's like wearing a cloud!
Next up I have this fresh pistachio green shawl, crocheted in a super soft pure merino yarn. Can be warm as a scarf on a chilly spring morning or as a wrap on a cool summer evening.
And finally something a little bit different. Dragon wing is an asymmetric scarf with a textured pattern in variegated shades of green, grey and blue.
Visit my Etsy shop Mrs Flowerpot's for further details.
Wednesday, 16 November 2016
Super Chunky Cable Scarf
Hi!
I've been having a lot of fun recently knitting super chunky scarves. I wanted to do a simple cable pattern but couldn't find one I liked so I wrote up my own.
It's very quick and easy to knit. The pattern repeat is 6 rows long and you can make the scarf however long you want to.
Instructions are below or you can download a printable PDF version HERE.
Super Chunky Cable Scarf
4 x 100g
balls of super bulky yarn for a 165cm/65" long scarf
A thick cable needle (or a wooden pencil sharp on both ends)
I've been having a lot of fun recently knitting super chunky scarves. I wanted to do a simple cable pattern but couldn't find one I liked so I wrote up my own.
It's very quick and easy to knit. The pattern repeat is 6 rows long and you can make the scarf however long you want to.
Instructions are below or you can download a printable PDF version HERE.
Super Chunky Cable Scarf
You will need:
10mm knitting needles
A thick cable needle (or a wooden pencil sharp on both ends)
Abbreviations:
K knit
P purl
C6F place 3 stitches onto cable needle and hold in front of work, knit next 3 stitches then knit 3 stitches from cable needle.
P purl
C6F place 3 stitches onto cable needle and hold in front of work, knit next 3 stitches then knit 3 stitches from cable needle.
To make the scarf:
Cast on 18 stitches.
Row 1: K6, P6, K6.
Row 2: Knit to end.
Row 3: K6, P6, K6.
Row 4: Knit to end.
Row 5: K6, P6, K6.
Row 6: K6, C6F, K6.
These 6 rows
form the pattern. Repeat these 6 rows
until the scarf is the desired length.
End after row 3. Cast off. Weave in ends.
©
Clair Louise Coult. You may use
this pattern to produce items for sale.
Wednesday, 19 October 2016
Charity auction for Canine Partners
As some of you may know I have a genetic condition called Ehlers Danlos Syndrome which causes hypermobile joints, pain, fatigue and a whole heap of other symptoms. I have become quite disabled by this condition to the point where I need assistance to do many tasks that most people take for granted.
Last year I came across a charity called Canine Partners. They provide disabled people with trained assistance dogs. The dogs are absolutely amazing! They can fetch the post, open doors, even empty the washing machine. I spoke to my family about it and we agreed that I should apply for a dog. I went through the assessment process and I have been placed on the waiting list.
It costs £20,000 to train and support a Canine Partner through their working life and I wanted to give something back. I wasn't sure how I could fund raise, I'm too sick to run a marathon or jump out of a plane so I looked at what I can do best. Crochet!
I've listed the blanket on eBay with 100% of the proceeds going to Canine Partners. If you want to buy a great blanket and support and even greater cause then please bid. The auction ends at 6pm on Monday 24th October.
If you'd like to make a donation or learn more about Canine Partners then please visit their website:
Last year I came across a charity called Canine Partners. They provide disabled people with trained assistance dogs. The dogs are absolutely amazing! They can fetch the post, open doors, even empty the washing machine. I spoke to my family about it and we agreed that I should apply for a dog. I went through the assessment process and I have been placed on the waiting list.
It costs £20,000 to train and support a Canine Partner through their working life and I wanted to give something back. I wasn't sure how I could fund raise, I'm too sick to run a marathon or jump out of a plane so I looked at what I can do best. Crochet!
I made this blanket in purple (to match the Canine Partners logo) and cream, I chose a chunky acrylic yarn which is very soft, warm and easy to care for. It measure 48" square and it would be great for snuggling up in your favourite arm chair on a cold winters evening.
I've listed the blanket on eBay with 100% of the proceeds going to Canine Partners. If you want to buy a great blanket and support and even greater cause then please bid. The auction ends at 6pm on Monday 24th October.
If you'd like to make a donation or learn more about Canine Partners then please visit their website:
Thank you!
Labels:
assistance dog,
blanket,
Canine Partners,
charity auction,
crochet,
disability,
ehlers danlos syndrome,
fundraising,
purple,
support dog
Thursday, 29 September 2016
#CrochetGO Giveaway!
Hi!
For the past few months I've been making little crochet Pokemon figures to give away as part of the #CrochetGo movement. It's been so much fun! I've been hiding them around my home town centre and in video game stores for Pokemon Go players to find. And when people find them they post on Twitter or Instagram with the hashtag #CrochetGo to let me know they've been found.
People from all over the world have been taking part. Check out #CrochetGo on Twitter and Instagram to see the characters people have created and the happy faces of the Pokemon fans who found them.
Now I'm giving my blog readers a chance at winning this little group of Pokemon in Mrs Flowerpot's #CrochetGo Givea
There is Charmander, Squirtle, Psyduck, Horsea, Pikachu, Staryu and a Pokeball up for grabs.
The competition is now closed. Thank you for entering.
The winner will be announced shortly.
Closing date is 15th October 2016 midnight GMT.
A winner will be drawn at random from all entries received before the closing date.
The winner will be contacted by email.
I promise not to spam you or sell your details.
Mrs Flowerpot's decision is final.
Good luck everyone!
Oh yeah, before anyone asks I'm really sorry but I do not sell Pokemon figures. Pokemon characters are protected by copyright and I would be in breach of that copyright law if I made them to sell without having permission or a licence from the copyright holder.
I do however sell some pretty awesome crochet lace shawls on my Etsy store so if you're looking for something special then please visit Mrs Flowerpot's Emporium
For the past few months I've been making little crochet Pokemon figures to give away as part of the #CrochetGo movement. It's been so much fun! I've been hiding them around my home town centre and in video game stores for Pokemon Go players to find. And when people find them they post on Twitter or Instagram with the hashtag #CrochetGo to let me know they've been found.
People from all over the world have been taking part. Check out #CrochetGo on Twitter and Instagram to see the characters people have created and the happy faces of the Pokemon fans who found them.
Now I'm giving my blog readers a chance at winning this little group of Pokemon in Mrs Flowerpot's #CrochetGo Givea
There is Charmander, Squirtle, Psyduck, Horsea, Pikachu, Staryu and a Pokeball up for grabs.
The competition is now closed. Thank you for entering.
The winner will be announced shortly.
Closing date is 15th October 2016 midnight GMT.
A winner will be drawn at random from all entries received before the closing date.
The winner will be contacted by email.
I promise not to spam you or sell your details.
Mrs Flowerpot's decision is final.
Good luck everyone!
Oh yeah, before anyone asks I'm really sorry but I do not sell Pokemon figures. Pokemon characters are protected by copyright and I would be in breach of that copyright law if I made them to sell without having permission or a licence from the copyright holder.
I do however sell some pretty awesome crochet lace shawls on my Etsy store so if you're looking for something special then please visit Mrs Flowerpot's Emporium
Labels:
#crochetgo,
Charmander,
crochet,
Etsy,
giveaway,
pikachu,
Pokemon Go,
Pokeomn,
Psyduck,
Squirtle,
Staryu
Thursday, 8 September 2016
Meet Horsea - the little water Pokemon
Meet Horsea! Isn't he cute?
I've been busy making lots of Pokemon for #CrochetGo using Nichole's Nerdy Knots patterns and I thought I'd have a go at writing my own. I love water Pokemon so I chose Horsea because he didn't look too complicated.
It turns out that pattern writing isn't that easy but after a few false starts and revisions I got there in the end. And here he is!
Anyway, if you'd like to make your own Horsea here's the pattern. It's written in British crochet terms using DK yarn but you want to make it in worsted I'd recommend going up to a 4mm hook.
There's a PDF version of the pattern if you want to print it out.
Happy crocheting!
Horsea Pokemon
I've been busy making lots of Pokemon for #CrochetGo using Nichole's Nerdy Knots patterns and I thought I'd have a go at writing my own. I love water Pokemon so I chose Horsea because he didn't look too complicated.
It turns out that pattern writing isn't that easy but after a few false starts and revisions I got there in the end. And here he is!
Anyway, if you'd like to make your own Horsea here's the pattern. It's written in British crochet terms using DK yarn but you want to make it in worsted I'd recommend going up to a 4mm hook.
There's a PDF version of the pattern if you want to print it out.
Happy crocheting!
Horsea Pokemon
You will need:
oddments of DK yarn in the following colours:
pale blue
pale yellow/cream
white
red
black
oddments of DK yarn in the following colours:
pale blue
pale yellow/cream
white
red
black
3.5mm
crochet hook
tapestry needle
toy stuffing
tapestry needle
toy stuffing
Please note: this pattern uses British
crochet terms.
Abbreviations:
ch chain
dc double chain
bldc back loop double chain
slst slip stitch
htr half treble
inc increase by working 2dc into the same stitch
ch chain
dc double chain
bldc back loop double chain
slst slip stitch
htr half treble
inc increase by working 2dc into the same stitch
dec decrease by working 2dc together
over next two stitches
join join to first dc of round with a slip stitch
Before you start:
Exact gauge is not important but you need to make a firm fabric with small holes so the toy stuffing doesn't show through. Go down a hook size if you need to.
Gently stuff the head and body after the first decrease round and keep topping up the stuffing as you near the last row. Don't over stuff, it just needs to be firm enough to hold its shape.
join join to first dc of round with a slip stitch
Before you start:
Exact gauge is not important but you need to make a firm fabric with small holes so the toy stuffing doesn't show through. Go down a hook size if you need to.
Gently stuff the head and body after the first decrease round and keep topping up the stuffing as you near the last row. Don't over stuff, it just needs to be firm enough to hold its shape.
To make the head:
Using black make a magic ring.
Round 1: 6dc in the ring, pull ring tight, join and change to pale blue yarn.
Round 2: 1ch, dc into each stitch, join. (6)
Round 3: 1ch, bldc into each stitch, join. (6)
Round 4 - 7: 1ch, dc into each stitch, join. (6)
Round 8: 1ch, inc into each stitch, join. (12)
Round 9: 1ch, *(1dc, inc) repeat from * to end, join. (18)
Round 10: 1ch, *(2dc, inc) repeat from * to end, join. (24)
Round 11 - 13: 1ch, dc in each stitch, join. (24)
Round 14: 1ch, *(2dc, dec) repeat from * to end, join. (18)
Round 15: 1ch, *(1ch, dec) repeat from * to end, join. (12)
Round 1: 6dc in the ring, pull ring tight, join and change to pale blue yarn.
Round 2: 1ch, dc into each stitch, join. (6)
Round 3: 1ch, bldc into each stitch, join. (6)
Round 4 - 7: 1ch, dc into each stitch, join. (6)
Round 8: 1ch, inc into each stitch, join. (12)
Round 9: 1ch, *(1dc, inc) repeat from * to end, join. (18)
Round 10: 1ch, *(2dc, inc) repeat from * to end, join. (24)
Round 11 - 13: 1ch, dc in each stitch, join. (24)
Round 14: 1ch, *(2dc, dec) repeat from * to end, join. (18)
Round 15: 1ch, *(1ch, dec) repeat from * to end, join. (12)
Round 16: 1ch, dec to end, join. Fasten off.
Use tail to draw through stitches and close up hole.
To make head spikes:
Using pale blue *make 6ch, htr in second chain from hook, 1 htr in each stitch to end. Do not fasten off. Repeat from * twice more. You should have three spikes all joined together. Fasten off leaving a long tail to sew onto the head.
Make a second set of spikes in the same way.
To make tail and body:
To make head spikes:
Using pale blue *make 6ch, htr in second chain from hook, 1 htr in each stitch to end. Do not fasten off. Repeat from * twice more. You should have three spikes all joined together. Fasten off leaving a long tail to sew onto the head.
Make a second set of spikes in the same way.
To make tail and body:
Using pale
blue make a magic ring.
Round 1: 6dc into magic ring, join. (6)
Round 2: 1ch, dc into each stitch to end, join. (6)
Round 3: 1ch, *(1dc, inc), repeat from * to end, join. (9)
Rounds 4 - 10: 1ch, dc into each stitch, join. (9)
Round 11: 1ch, *(2dc, inc), repeat from * to end, join. (12)
Round 12: (1ch, *(1dc, inc), repeat from * to end, join. (18)
Round 13: 1ch, *(2dc, inc), repeat from * to end, join. (24)
Round 14: 1ch, *(3dc, inc), repeat from * to end, join. (30)
Round 15 - 16: 1ch, dc in each stitch, join. (30)
Round 17: 1ch, *(3dc, dec), repeat from * to end, join. (24)
Round 18: 1ch, dc in each stitch, join. (24)
Round 19: 1ch, *(2dc, dec), repeat from * to end, join. (18)
Round 20: 1ch, dc in each stitch, join. (18)
Round 21: 1ch, *(1dc, dec), repeat from * to end, join. (12)
Round 22: 1ch, dc in each stitch, join. (12)
Round 23: 1ch, dec to end, join. (6)
Fasten off leaving a long tail to stitch head onto body.
Round 1: 6dc into magic ring, join. (6)
Round 2: 1ch, dc into each stitch to end, join. (6)
Round 3: 1ch, *(1dc, inc), repeat from * to end, join. (9)
Rounds 4 - 10: 1ch, dc into each stitch, join. (9)
Round 11: 1ch, *(2dc, inc), repeat from * to end, join. (12)
Round 12: (1ch, *(1dc, inc), repeat from * to end, join. (18)
Round 13: 1ch, *(2dc, inc), repeat from * to end, join. (24)
Round 14: 1ch, *(3dc, inc), repeat from * to end, join. (30)
Round 15 - 16: 1ch, dc in each stitch, join. (30)
Round 17: 1ch, *(3dc, dec), repeat from * to end, join. (24)
Round 18: 1ch, dc in each stitch, join. (24)
Round 19: 1ch, *(2dc, dec), repeat from * to end, join. (18)
Round 20: 1ch, dc in each stitch, join. (18)
Round 21: 1ch, *(1dc, dec), repeat from * to end, join. (12)
Round 22: 1ch, dc in each stitch, join. (12)
Round 23: 1ch, dec to end, join. (6)
Fasten off leaving a long tail to stitch head onto body.
To make the chest:
Using pale
yellow or cream yarn make 4 ch, leaving a long tail for sewing chest onto the
body.
Row 1: Dc into second ch from hook, dc to end, 1ch, turn. (3)
Row 2: Inc, dc, inc, 1ch, turn. (5)
Row 3: Inc, 3dc, inc, 1ch, turn. (7)
Row 4: Inc, 5dc, ince, 1ch, turn. (9)
Row 5 - 6: Dc to end, 1ch, turn. (9)
Row 7: Dec, 5 dc, dec, 1 ch, turn. (7)
Row 8: Dec, 3dc, dec, 1ch, turn. (5)
Row 9: Dec, 1ch, dec, 1ch, turn. (3)
Row 10: 3dctog. Fasten off.
Row 1: Dc into second ch from hook, dc to end, 1ch, turn. (3)
Row 2: Inc, dc, inc, 1ch, turn. (5)
Row 3: Inc, 3dc, inc, 1ch, turn. (7)
Row 4: Inc, 5dc, ince, 1ch, turn. (9)
Row 5 - 6: Dc to end, 1ch, turn. (9)
Row 7: Dec, 5 dc, dec, 1 ch, turn. (7)
Row 8: Dec, 3dc, dec, 1ch, turn. (5)
Row 9: Dec, 1ch, dec, 1ch, turn. (3)
Row 10: 3dctog. Fasten off.
To make the fins:
Using pale
yellow or cream yarn make 2 ch.
Row 1: Inc in second chain from hook, 1ch, turn. (2)
Row 2: Inc in each dc, 1ch, turn. (4)
Row 3: Inc, 2dc, inc, 1ch, turn. (6)
Row 4 - 6: Dc in each stitch, 1ch, turn. (6)
Row 7: Dec, 2ch, dec, 1ch, turn. (4)
Row 8: Dc in each stitch, 1ch, turn. (4)
Row 9: Dec, twice. Fasten off.
Make a second fin in the same way.
To make up:
Row 1: Inc in second chain from hook, 1ch, turn. (2)
Row 2: Inc in each dc, 1ch, turn. (4)
Row 3: Inc, 2dc, inc, 1ch, turn. (6)
Row 4 - 6: Dc in each stitch, 1ch, turn. (6)
Row 7: Dec, 2ch, dec, 1ch, turn. (4)
Row 8: Dc in each stitch, 1ch, turn. (4)
Row 9: Dec, twice. Fasten off.
Make a second fin in the same way.
To make up:
Sew spikes
onto the sides of the head.
Sew the head onto the body.
Sew the chest onto the body.
Sew the tail in a tight curl towards the body.
Sew the fins onto the back about 2.5cm/1" below the head.
Embroider the eyes using red, white and black.
Pattern written by Clair Louise Coult.
Sew the head onto the body.
Sew the chest onto the body.
Sew the tail in a tight curl towards the body.
Sew the fins onto the back about 2.5cm/1" below the head.
Embroider the eyes using red, white and black.
Pattern written by Clair Louise Coult.
This pattern is for personal use only.
You can download a PDF version of this pattern here: Horsea Pokemon
Labels:
#crochetgo,
amigurumi,
crochet,
Horsea,
pokemon,
Pokemon Go
Monday, 5 September 2016
The Big Knit - Pikachu Crochet Pattern
Hi!
Every year I take part in Innocent Smoothies The Big Knit. I make and send in miniature hats to go on top of smoothie bottles. For each hat Innocent give Age concern a donation. How cool is that?
It's a fun way to fund raise and each year I like to do something a little bit special. This year the world has gone Pokemon mad so I thought I'd make some Pokemon themed hats.
The first one I made was Pikachu, my favourite Pokemon. Isn't he cute? I've also made a Pokeball hat and now I'm musing over what character to make next.
Anyway, I've written up the pattern if you want to make one too. It's not too difficult and you only need oddments of yarn so go dive in your stash and make your own Pikachu for The Big Knit.
To make the ears:
Send your finished hat to the address on the Innocent Smoothies The Big Knit website.
Happy crocheting!
Every year I take part in Innocent Smoothies The Big Knit. I make and send in miniature hats to go on top of smoothie bottles. For each hat Innocent give Age concern a donation. How cool is that?It's a fun way to fund raise and each year I like to do something a little bit special. This year the world has gone Pokemon mad so I thought I'd make some Pokemon themed hats.
The first one I made was Pikachu, my favourite Pokemon. Isn't he cute? I've also made a Pokeball hat and now I'm musing over what character to make next.
Anyway, I've written up the pattern if you want to make one too. It's not too difficult and you only need oddments of yarn so go dive in your stash and make your own Pikachu for The Big Knit.
You will need:
Oddments of
DK yarn in yellow, black and red
3.5mm crochet hook
2 x 8mm sequins or buttons for eyes (optional)
3.5mm crochet hook
2 x 8mm sequins or buttons for eyes (optional)
Please note - Instructions are
written using British crochet terms.
Abbreviations:
ch chain
dc double crochet
inc increase by working 2dc into the same stitch
join join to first stitch of round with a slip stitch
dc double crochet
inc increase by working 2dc into the same stitch
join join to first stitch of round with a slip stitch
To make the hat:
Using yellow
yarn make a magic ring.
Round 1: 6 dc into the ring. Join and pull the ring tight.
Round 2: 1ch, inc into each stitch to end. Join. (12)
Round 3: 1 ch, *(1 dc, inc), repeat from * to end. Join. (18)
Round 4: 1 ch, *(2 dc, inc), repeat from * to end. Join. (24)
Rounds 5 - 10: 1 ch, dc into each stitch to end. Join. (24)
After round 10 fasten off and weave in ends.
Round 1: 6 dc into the ring. Join and pull the ring tight.
Round 2: 1ch, inc into each stitch to end. Join. (12)
Round 3: 1 ch, *(1 dc, inc), repeat from * to end. Join. (18)
Round 4: 1 ch, *(2 dc, inc), repeat from * to end. Join. (24)
Rounds 5 - 10: 1 ch, dc into each stitch to end. Join. (24)
After round 10 fasten off and weave in ends.
Using black
yarn make a magic ring.
Round 1: 5dc into magic ring. Join and pull the ring tight.
Round 2: 1 ch, dc into each stitch to end. Join and change to yellow yarn.
Rounds 3 - 6: 1 ch, dc into each stitch. Join.
After round 6 fasten off leaving a long tail to sew the ear onto the hat.
Make the second ear in the same way.
Round 1: 5dc into magic ring. Join and pull the ring tight.
Round 2: 1 ch, dc into each stitch to end. Join and change to yellow yarn.
Rounds 3 - 6: 1 ch, dc into each stitch. Join.
After round 6 fasten off leaving a long tail to sew the ear onto the hat.
Make the second ear in the same way.
To make the cheeks:
Using red
yarn make a magic ring.
Round 1: 5dc into magic ring. Join with a slip stitch and pull the ring tight. Fasten off and leave a long tail for sewing the cheeks onto the hat.
Make a second cheek in the same way.
Round 1: 5dc into magic ring. Join with a slip stitch and pull the ring tight. Fasten off and leave a long tail for sewing the cheeks onto the hat.
Make a second cheek in the same way.
To make up the hat:
Using the
long tail stitch the ears onto the hat approximately between rounds 3 and 5.
Sew on 8mm black sequins or buttons for the eyes. Alternatively you can embroider the eyes or stitch on small circles of felt.
Using the
long tail stitch the red cheeks onto the hat.
They will be almost at the bottom edge and space slightly wider than the
eyes.
Send your finished hat to the address on the Innocent Smoothies The Big Knit website.
Happy crocheting!
Labels:
amigurumi,
crochet,
double knit,
innocent,
innocent smoothies,
magic ring,
pikachu,
pokemon,
the big knit
Monday, 29 August 2016
A new Pokemon phenomenon - #CrochetGo
For the past couple of weeks I've been busy crocheting something different - pocket monsters, better known as Pokemon! I was a huge fan when Pokemon came out, I watched the adventures of Ash and Pikachu on the TV show and I even bought a Pikachu backpack.
Now I'm a mum and my kids have seriously become addicted to Pokemon Go, spending every waking minute searching the streets for new Pokemon to catch, looking for Pokestops and battling in gyms around town.
I came across some crochet patterns for Pokemon on Ravelry and learned that a lady called Nichole from Texas, USA, had started something called #CrochetGo. She was posting free crochet patterns for Pokemon and encouraging people to make them and leave them at Pokestops in their home towns for Pokemon Go players to find.
Each Pokemon had a tag asking the finder to post a photograph on social media with the hashtag #CrochetGo so the maker could keep track of which Pokemon had been found. I thought it was an excellent idea so I dived into my stash and started crocheting!
I left my Pokemon at Pokestops and game shops in Worksop, Nottinghamshire, UK and I've had some wonderful messages on Twitter from people who have found my gifts. It's such a rewarding thing to do, especially when you see happy faces of the children who found a real life Pokemon.
If you want to take part in #Crochet Go check out the following Facebook groups:
Now I'm a mum and my kids have seriously become addicted to Pokemon Go, spending every waking minute searching the streets for new Pokemon to catch, looking for Pokestops and battling in gyms around town.
I came across some crochet patterns for Pokemon on Ravelry and learned that a lady called Nichole from Texas, USA, had started something called #CrochetGo. She was posting free crochet patterns for Pokemon and encouraging people to make them and leave them at Pokestops in their home towns for Pokemon Go players to find.
Each Pokemon had a tag asking the finder to post a photograph on social media with the hashtag #CrochetGo so the maker could keep track of which Pokemon had been found. I thought it was an excellent idea so I dived into my stash and started crocheting!
I left my Pokemon at Pokestops and game shops in Worksop, Nottinghamshire, UK and I've had some wonderful messages on Twitter from people who have found my gifts. It's such a rewarding thing to do, especially when you see happy faces of the children who found a real life Pokemon.
If you want to take part in #Crochet Go check out the following Facebook groups:
Gotta catch 'em all!
Labels:
#crochetgo,
amigurumi,
crochet,
crochetgo,
pokemon,
pokemongo,
ravelry,
social media,
twitter
Friday, 12 August 2016
Meet Roberta, my spinning saviour!
A few years ago a good friend of mine, Babylonglegs, got me into spinning. I tried out her Louet S10 and loved it so I bought my own Louet S15. It was so therapeutic turning the fluffy clouds of wool fibre into squishy multicoloured yarns but one thing was holding me back - pain. I didn't know it at the time but I had Ehlers Danlos Syndrome, a connective tissue disorder which causes hypermobile joints and pain (along with lots of other unpleasant symptoms).
I found it difficult treadling with my right knee and the pain almost made me quit spinning but I don't give up that easily. I traded my S15 in for a very pretty Louet S51 DT, hoping that using both legs on the double treadle would ease my pain. Sadly for me it didn't and my lovely spinning wheel and my stash of fluffy fibre have sat unloved for the past few years.
I really missed spinning and I was determined to find a way to continue my hobby. I researched electric spinning wheels (no treadling required!) but they were all very expensive, ranging from £430 for an Ashford E Spinner to over £1000 for a Hansen Mini Spinner. They were all out of my price range so I scoured buy and sell groups and checked eBay every day for months until this one electronic wheel appeared. An Ertoel Roberta.
The seller didn't seem to know much about spinning, the wheel looked in really bad shape but from the photographs it looked like all the important bits were there. The starting bid was £20, which is incredibly low considering they sell new in America for $1,095. I watched the auction until the very last few minutes and I put in my bid. I didn't think I was going to win, I was convinced someone was going to outbid me and I prepared myself for disappointment but when the countdown ended I was the highest bidder at £129.77!
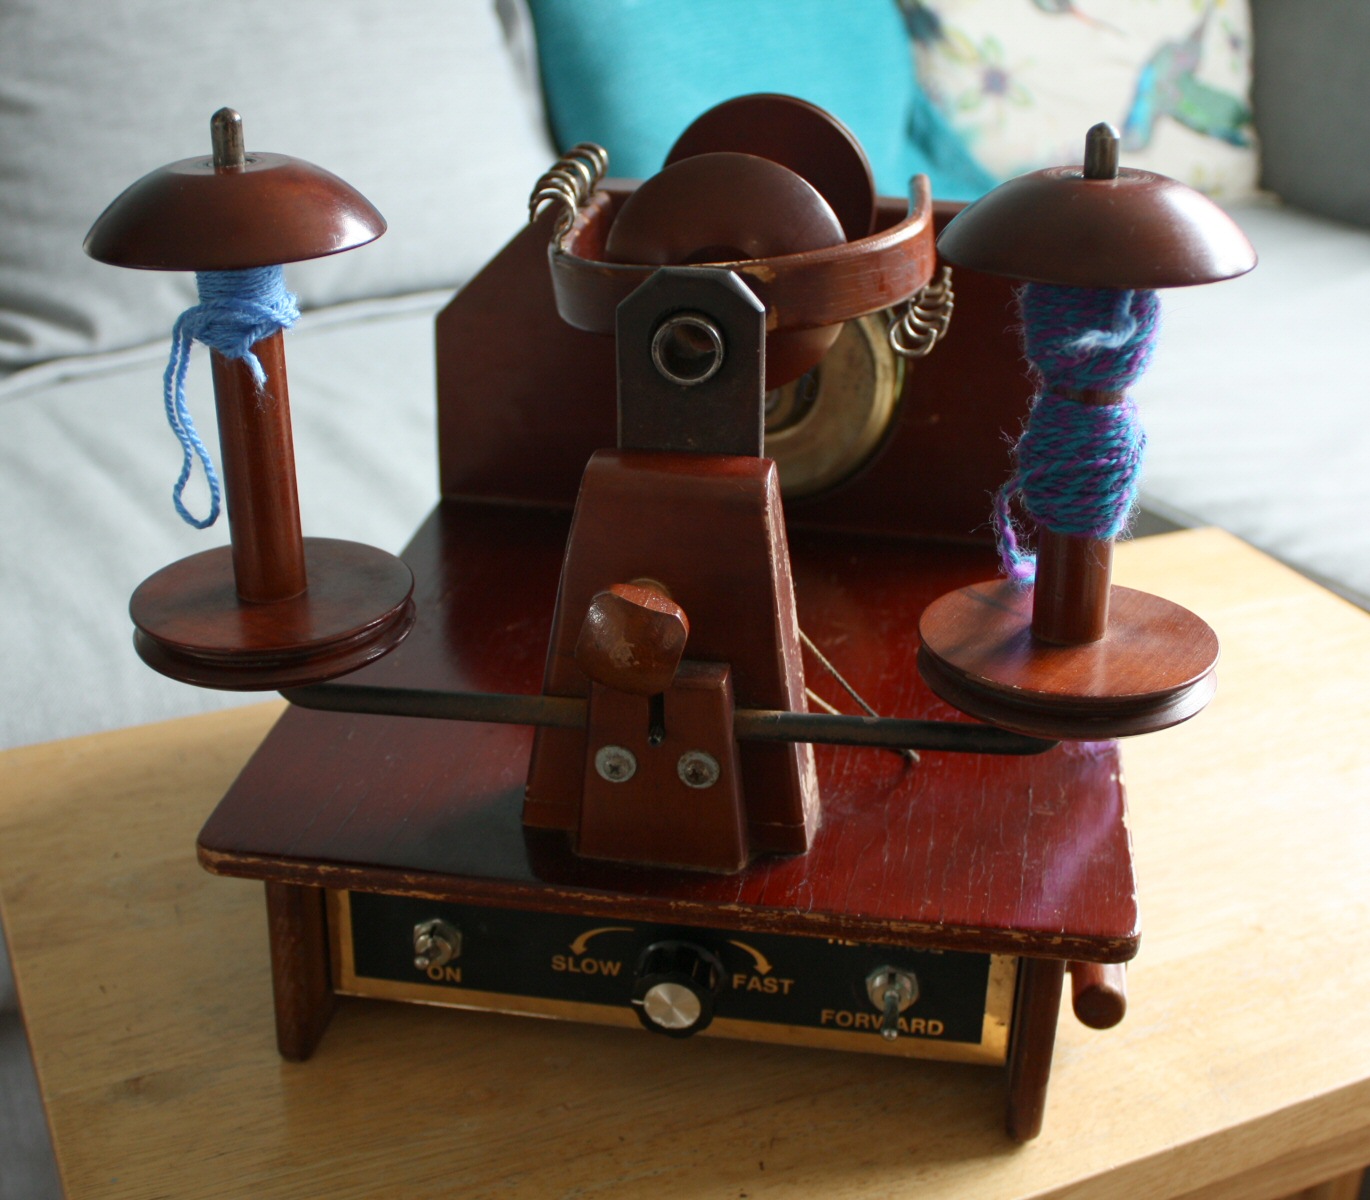
I did my happy dance and then patiently waited for my parcel to arrive. And this is what I got.
After doing some research I discovered she's about 30 years old and made in Australia. Cosmetically she needs a little TLC. The lacquer is peeling off the woodwork and the orifice hook holder is broken but there is nothing that can't be fixed.
The flyer is a little rusty and slightly bent so that will need replacing with a modern jumbo flyer, one of the bobbins rattles a little and the leather bearings have seen better days but everything else is in good working order.
I'm back spinning and I couldn't be happier :)
I found it difficult treadling with my right knee and the pain almost made me quit spinning but I don't give up that easily. I traded my S15 in for a very pretty Louet S51 DT, hoping that using both legs on the double treadle would ease my pain. Sadly for me it didn't and my lovely spinning wheel and my stash of fluffy fibre have sat unloved for the past few years.
I really missed spinning and I was determined to find a way to continue my hobby. I researched electric spinning wheels (no treadling required!) but they were all very expensive, ranging from £430 for an Ashford E Spinner to over £1000 for a Hansen Mini Spinner. They were all out of my price range so I scoured buy and sell groups and checked eBay every day for months until this one electronic wheel appeared. An Ertoel Roberta.
The seller didn't seem to know much about spinning, the wheel looked in really bad shape but from the photographs it looked like all the important bits were there. The starting bid was £20, which is incredibly low considering they sell new in America for $1,095. I watched the auction until the very last few minutes and I put in my bid. I didn't think I was going to win, I was convinced someone was going to outbid me and I prepared myself for disappointment but when the countdown ended I was the highest bidder at £129.77!
I did my happy dance and then patiently waited for my parcel to arrive. And this is what I got. After doing some research I discovered she's about 30 years old and made in Australia. Cosmetically she needs a little TLC. The lacquer is peeling off the woodwork and the orifice hook holder is broken but there is nothing that can't be fixed.
The flyer is a little rusty and slightly bent so that will need replacing with a modern jumbo flyer, one of the bobbins rattles a little and the leather bearings have seen better days but everything else is in good working order.
I'm back spinning and I couldn't be happier :)
Labels:
Ashford,
Babylonglegs,
ehlers danlos syndrome,
Ertoel,
handspun,
Hansen,
Louet,
Mini Spinner,
Roberta,
spinning,
wool,
yarn
Sunday, 1 May 2016
Mrs Flowerpot's new shop!
Hi!
I'd like to invite you over to my new shop, Mrs Flowerpot's. I've set up on Etsy selling my crochet shawls and other trinkets and accessories.
As some of you may know I started Flowerpot Tots 12 years ago selling wool longies and cloth nappies. My children are growing up fast and my nappy days are long behind me so I thought I'd put my talents to good use making something a little more grown up.
I have always loved to crochet, I caught the bug when I was 15 and I've never stopped. I've made everything from granny square blankets to intricate doilies using crochet hooks so small you can barely see them.
Recently I've been making a lot of shawls in sock and lace weight yarns. I've posted pictures on social media and people started asking if I was selling them, so I thought it would be a good idea to set up shop.
At the moment I only have shawls in stock but I hope to be adding some Japanese knot bag very soon. They make excellent project bags for your knitting of crochet.
So please pop by the shop and if you like what you see add me to your favourites so you won't miss out on the latest updates.
See you soon!
I'd like to invite you over to my new shop, Mrs Flowerpot's. I've set up on Etsy selling my crochet shawls and other trinkets and accessories.
As some of you may know I started Flowerpot Tots 12 years ago selling wool longies and cloth nappies. My children are growing up fast and my nappy days are long behind me so I thought I'd put my talents to good use making something a little more grown up.
I have always loved to crochet, I caught the bug when I was 15 and I've never stopped. I've made everything from granny square blankets to intricate doilies using crochet hooks so small you can barely see them.
Recently I've been making a lot of shawls in sock and lace weight yarns. I've posted pictures on social media and people started asking if I was selling them, so I thought it would be a good idea to set up shop.
At the moment I only have shawls in stock but I hope to be adding some Japanese knot bag very soon. They make excellent project bags for your knitting of crochet.
So please pop by the shop and if you like what you see add me to your favourites so you won't miss out on the latest updates.
See you soon!
Monday, 20 April 2015
Magenta Tartan Granny Square Blanket
I love making granny square blankets but sometimes they look a bit old fashioned. I'd seen other people do tartan and plaid style blankets so I thought I'd give it a go myself. To make it look like tartan the trick is to use two main colours that produce another shade where the lines meet. For my blanket I chose magenta and teal with purple cross over squares on a neutral grey background.
Materials:
Stylecraft Special DK 100g
4 x silver
2 x magenta
2 x petrol
1 x emperor
4mm crochet hook.
Finished blanket was 14 x 14 squares and measured approximately 110cm (43") square. It's easy to make a larger blanket by repeating the pattern.
I made basic crochet granny squares, working three rounds before fastning off. I followed the pattern below and joined the squares together as I went along but if you're joining them later you need to make the following number of squares in each colour:
100 x silver
40 x magenta
40 x petrol
16 x emperor
My granny square pattern (UK crochet terms)
Make 5 chains and join in a circle with a slip stitch.
Round 1: Make 3ch to count as first treble, into the circle work 2tr, 2ch. (3tr, 2ch) three times. Join with a slip stitch to the top of the first 3ch.
Rounds 2: Slip stitch into the next 2tr and 2ch loop. Make 3ch, 2tr, 2ch 3tr into the 2ch loop, 1ch. *3tr, 2 ch, 3tr into the next 2ch loop, 1ch. Repeat from * two more times. Join with a slip stitch to the top of the first 3ch.
Round 3: Slip stitch into the next 2tr and 2ch loop. Make 3ch, 2tr, 2ch, 3tr into the 2ch loop, 1ch. *3tr in the next 1ch space, 1ch. (3tr, 2 ch, 3tr) into the next 2ch loop, 1ch. Repeat from * twice more. 3tr in the next 1ch space, 1ch. Join with a slip stitch to the top of the first 3ch and fasten off.
Join the squares in the following pattern.
S - silver (grey)
M - magenta (pink)
P - petrol (blue)
E - emperor (purple)
I finished the blanket off with three rounds of double chains (US single chains) in emperor to give it a neat edge. I worked 3dc into each corner, one dc into the top of each tr, 1dc into each 1ch space and 2dc together where the squares join (1dc into each corner 2ch space, worked together).
The pattern is adaptable to any number of colour combinations but I think it looks best if you stick to colours that blend to form another colour, for example yellow and red crossing over to make orange, or blue and yellow crossing over to make green.
You can make the blanket any size you like by simply working as many pattern repeats as required. Each square measures approximately 7cm (3")
Happy crocheting!
Labels:
blanket,
crochet,
granny square,
plaid,
tartan
Friday, 17 October 2014
The Big Knit - Mrs Flowerpot's Crochet Hat Pattern
For the past few years I've donated cute little hats for Innocent Smoothies The Big Knit For each little hat sold they make a donation to Age UK to help
I enjoy knitting but my first love is crochet so I made up my own crochet pattern for hats and I thought I'd share it with you.
The Big Knit - Crochet Hat
Pattern
(UK crochet terms)
You will need:
Double knit yarn
4mm crochet hook
Scissors
Darning needle
4mm crochet hook
Scissors
Darning needle
Round 1: Start with a magic loop, make 6dc into the
loop. Pull it closed and join with a
slip stitch into the first dc.
Round 2: 1ch. Work
2dc into each dc (starting in the same dc as the slip stitch). Join to first dc with a slip stitch. 12dc.
Round 3: 1ch. Work
1dc into same dc as slip stitch, 2dc into next stitch, *1dc, 2dc into next stitch. Repeat from * to end. Join with a slip stitch. 18dc.
Rounds 4-10: 1ch.
Work 1dc into each dc. Join with
a slip stitch. 18dc.
Fasten off. Weave in ends. Make a bobble to go on the top, if you like.
Stripes:
Work 4 rounds colour A.
Work 2 rounds colour B.
Work 2 rounds colour A.
Work 2 rounds colour B.
Work 2 rounds colour A.
Work 2 rounds colour B.
Fez:
Using red yarn work as for main
pattern for first three rounds. Round
four, work 1dc into the back loop only of each dc. Follow rest of main pattern. This will give the hat a flat top. Decorate top of fez with a black tassel.
That's the basics. Use your imagination and get crocheting!
Friday, 28 September 2012
Another Perfect Angel - Out Now!
Hi!It's been a lot of hard work, there have been tears, laughter (mostly at my stupid typos) but finally it's finished!
I'm pleased to announce that Another Perfect Another is now available to purchase from Amazon and Smashwords. It's the sequel to my debut novel, Heaven Knows This Time, and it continues the story of Angel and Miles as they embark on their relationship together.
Nothing ever seems to go to plan in Angel's life. She discovers that Miles has been hiding a secret from his past and she struggles with the physical and emotional challenges when she discovers she is unexpectedly pregnant with his child.
It's another emotional roller coaster of a book, with an ex trying to stir things up for them and a stranger who is trying to steal Angel's inheritance. Is their love strong enough to carry them through?
I hope you enjoy the book and I'd really love to know what you think. Post a message here or better still write a review. Your comments are very much appreciated.
Cheers!
Clair
Sunday, 6 May 2012
Now Available to Purchase from Amazon!
I'm very pleased to announce that Heaven Knows This Time has now been published and is available to buy from Amazon's Kindle store:
Heaven Knows This Time by Clair Louise Coult
When the shy and quiet, 15 year old Angela Blackman is sent to the head teacher's office she doesn't expect to find live in the form of the 17 year old eccentric millionaire, Simon Wetherall. Upon discovering a shared love for the post punk band Joy Division, Simon sweeps Angela off her feet and they embark on a rather unusual affair, but the course of true love runs anything but smoothly. Angela discovers a whole new circle of friends within the alternative music scene but she finds herself having to grow up fast to deal with the trials and tragedies that fate brings her.
Contains adult themes, strong language and scenes of a sexual nature.
It's been an exciting and nerve wracking journey to get this far and I'm very grateful for the help and support of my friends and family for encouraging me to persue my dream of publishing my own book. Special thanks to my husband Trevor for taking the time to proof read the book for me. So if you find any typos it's his fault :P
I hope you enjoy the story. I'd love to hear your feedback, please feel free to leave your comments or email me at clair@clairlouisecoult.com
Clair
Tuesday, 17 April 2012
I've written a novel!
I'm not quite sure how it happened but I've written a novel. I know it sounds daft to have written a whole book by accident but that is how it happened. When my husband went away for a long weekend RC car racing in January I had an idea for a story so I started writing, and writing, and I didn't stop until I'd got about 93 thousand words!
The story is quite involved but it's basically about a 15 year old girl called Angela who meets a very rich and handsome boy, Simon, at school. They play truant together after discovering a shared love for the band Joy Division. Their relationship grows and they follow a Joy Division tribute band called Unknown Pleasures. Angel, as Simon calls her falls desperately in love but their relationship is more than a little rocky as they have to deal with some very challenging obstacles. The story deals with young love, the alternative music scene, sex, drugs, grief and suicide.
I'm in the process of editting the book with a view to publishing it for Kindle. In the meantime I've put the first 2 chapters up on a blog if you want to have a peek.
Heaven Knows This Time
I hope you enjoy it and I'd love to know what you think. Constructive criticism is always appreciated :)
Clair
Saturday, 22 January 2011
Odd Socks


Ever since I picked up Stray Sock Sewing in the local library I've been addicted to making sock creatures. It's rather theraputic making them. They don't take long to sew so it's pretty much instant gratification as far as crafting goes and it's interesting to see how each creatures character develops as I stuff, shape and sew. Here's a couple of my latest critters, a cute kitty and a rather sad looking puppy (taken with my snazzy new camera!) Are they cute or what?
Friday, 7 January 2011
Say cheese!

A couple of friends have unwittingly inspired me to take up an old hobby again. I have always loved photography but I never really had the time or money to take it any more seriously than grabbing a few snap shots on holiday. Whilst i was recovering from my hysterectomy I made the mistake of looking up digital SLRs. Big mistake! I set my heart on a Canon EOS 500D but unfortunately there was no way I could meet the £500 price tag. So just after Christmas I was browsing on eBay (as you do...) looking at second hand cameras when I found a Canon EOS 450D at a bargain price. Hardly used, complete with image stabilising lens, I had to have it! Trev and my parents said they would chip in for my birthday next month so I bought it! Yay! I ordered a funky camera bag and Trev has bought me a book so I can learn how to use it properly. I can't wait until the weather gets better and I can take it out into the countryside, well at least as far as my scooter will get me!
Say cheese!
Wednesday, 19 May 2010
I ♥ Japanese craft books!

I haven't blogged in ages, I've either been ill or busy, mostly ill unfortunately.
Anyway, I took delivery of some fabric today so I dug out my Japanese craft books and I decided to make one of the bags from Ecobags. I love this pattern and had to give it a go. It's a very clever idea and so simple. The bag neatly folds up into the patch on the front and fastens with a button.
I ♥ Japanese craft books!
Wednesday, 3 February 2010
Woven Eyelet Scarf

I treated myself to some gorgeous Babylonglegs Radiance recently. I used it to knit a pair of longies for my Flowerpot Tots store and I used what was left to make myself a new scarf. I fell in love with woven stitch a while ago, I don't know why more people don't use it, I love the texture and drape it has, it is so easy to do and it looks that little bit different from normal crochet.
I was so pelased with the scarf that I wrote up the pattern. It's nothing fancy but it's a good substantial winter scarf and I think it really shows off the subtle colour changes in the Radiance yarn.
Enjoy!
Click to open FREE pattern for Woven Eyelet Scarf
Subscribe to:
Posts (Atom)